Bootstrap Checkbox Button
Overview
Sometimes the simplest features might just get pretty vital-- especially each time you get to need them. For example how do your visitors communicate with the webpages you build claiming a simple Boolean action-- simply yes or no relating to a couple of the issues you should ask, precisely how they do confirm the conditions or maybe line up a handful of the attainable selections they might possess. We commonly surpass this without paying much of an interest to the element chargeable for these types of actions but the Bootstrap Checkbox Design is really a really critical component-- one our forms can't really do without.
Inside the current fourth edition of the Bootstrap framework we are delivered with the
.form-check.form-check-label<div>.form-check.form-check-label<label><input>.form-check-inputExactly how to use the Bootstrap checkbox:
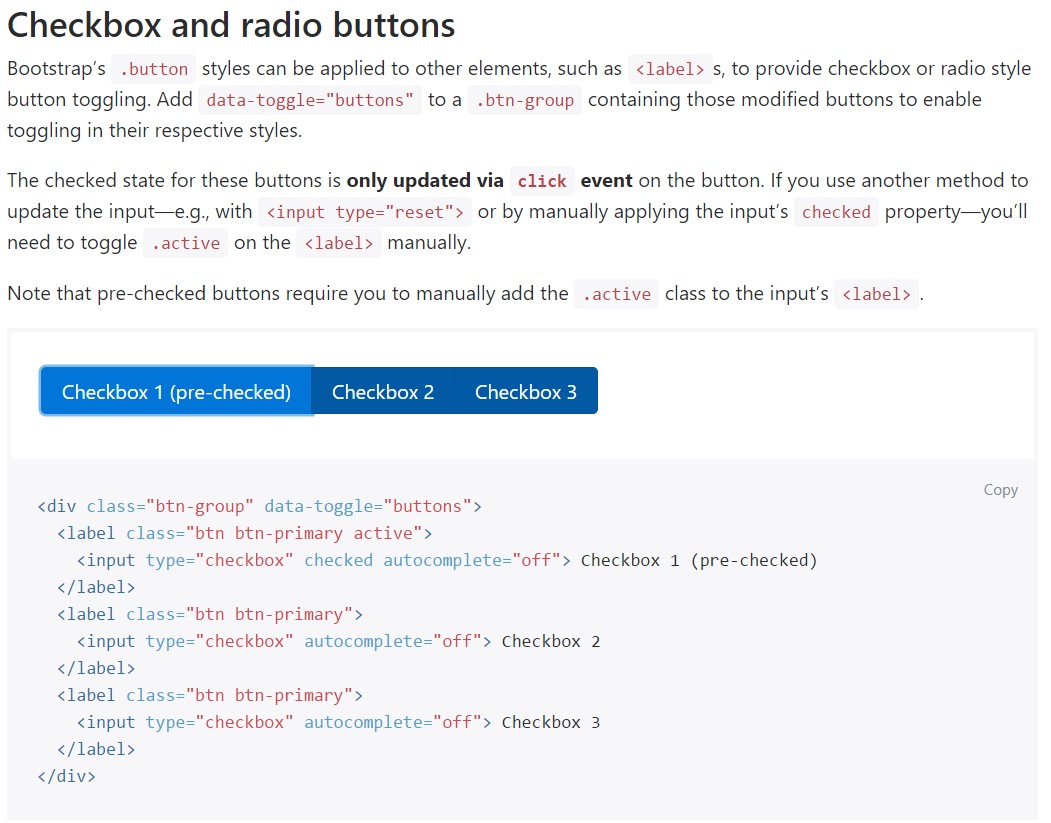
The checked state for these buttons is only updated via click event on the button.

<div class="btn-group" data-toggle="buttons">
  <label class="btn btn-primary active">
    <input type="checkbox" checked autocomplete="off"> Checkbox 1 (pre-checked)
  </label>
  <label class="btn btn-primary">
    <input type="checkbox" autocomplete="off"> Checkbox 2
  </label>
  <label class="btn btn-primary">
    <input type="checkbox" autocomplete="off"> Checkbox 3
  </label>
</div>
Sometimes we need the checkboxes to take place within our forms without the site visitor actually having the capacity to have any sort of activity selecting them-- that is generally where exactly the disabled option comes out.
To disable properly a checkbox in Bootstrap 4 employing the typical HTML attribute
disabledIf you enjoy the suggestion and simply want to work on this you really should specify the
.disabled.form-checkAn additional example
Whenever working with checkboxes, wrap all of them in a
<label>.custom-control.custom-checkboxUtilize
.custom-control-input<input>As well work with two
<span>.custom-control-indicator.custom-control-description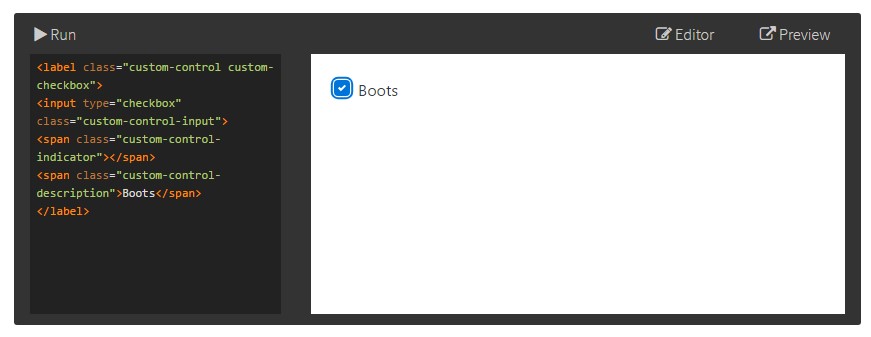
<label class="custom-control custom-checkbox">
<input type="checkbox" class="custom-control-input">
<span class="custom-control-indicator"></span>
<span class="custom-control-description">Boots</span>
</label>
Bootstrap Checkbox Design forms
Default checkboxes and radios are enhanced upon with the help of
.form-checkThe disabled class is going to also make lighter the text color tone to help signify the input's state.
A brand-new component for the Bootstrap edition 4 system is the launch of the so called custom form elements. These are actually the same elements we are familiar with within functionality though designated much more eye-catching and in the Bootstrap manner. By using them you can absolutely add certain taste as well as individuality to your content by just delegating a handful of special classes to the controls you feature in your forms.
To utilize custom-made checkboxes wrap them in a
<label>.custom-control.custom-checkbox<input>.custom-control-input<span>.custom-control-indicator.custom-control-descriptionFinal thoughts
That's nearly everything you must handle in order to put a checkbox feature inside of your Bootstrap 4 powered website page and bring in certain customized flavor to it adding it a quality appeals. And now everything you ought to do is repeat the exercise before you have actually reviewed all of the checkboxes desired are readily on the web page.
Check several video clip information about Bootstrap checkbox
Linked topics:
Bootstrap checkbox main information
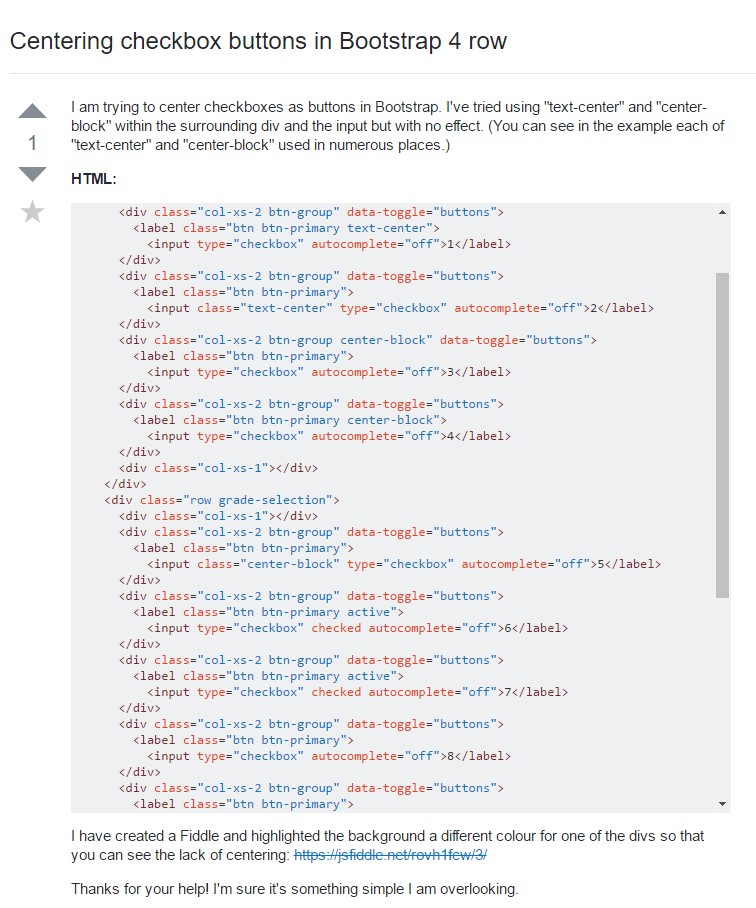
Centering checkbox buttons in Bootstrap 4 row
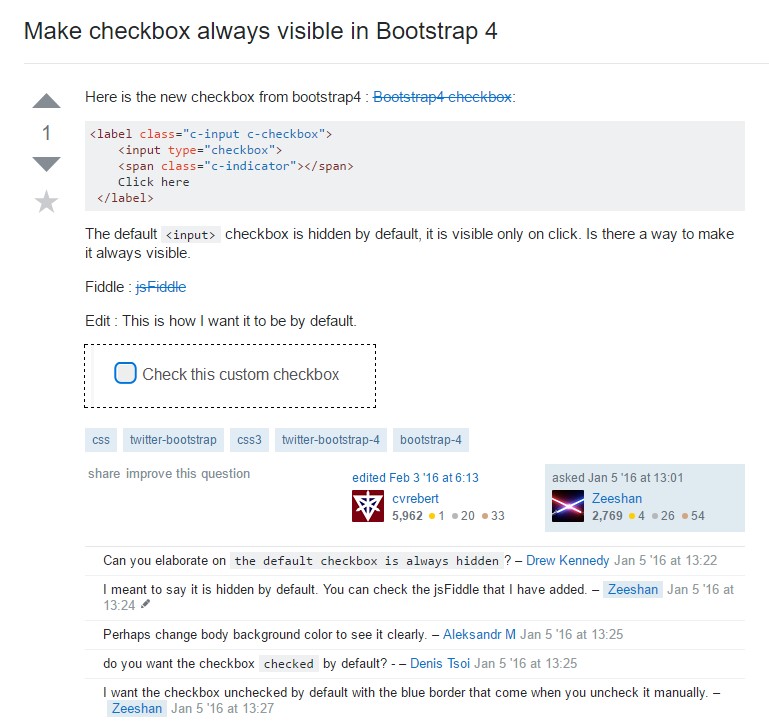
Make checkbox always visible in Bootstrap 4